Miss Art's Papercrafting School Review
As an addicted papercrafter, I spend quite a bit of my free time on the Internet looking at and learning from other papercrafters. It was during one of these virtual trips that I came across the site for Miss Art’s Papercrafting School. From that first introduction, I was intrigued to discover all that Miss Art’s has to offer. Miss Art’s offerings basically come under two categories; the offering of papercrafting supplies, and the offering of classes. Recently, Miss Art’s advertised the need for independent reviews of their classes, and I jumped at the opportunity. My first class was Miss Art's Guide to Mists, a 101 level class. Today, I am reviewing a level 201 class, Creative Carry-All.
Class Name: Creative Carry-All
Hosted by : Alyssa McGrew
What I Loved:
1. I appreciated that Alyssa showed three different custom books that could be made following the same procedures.
2. I loved learning techniques for creating a custom silhouette using a side shot photo.
3. I loved learning techniques for creating custom papers within Photoshop.
4. I enjoyed learning how to create a gusseted pocket folder – great way to hold a variety of items on a page!
Great Value
As a result of watching this class, I am more inspired to take the time to delve into the crafting possibilities of Photoshop. Even though I consider myself pretty technically savvy, I’ve shied away from using Photoshop based on the perceived learning curve involved. However, once I saw how easy some of the techniques were, it doesn’t seem so daunting.
Improvements:
1. Many of the videos available that I have watched would benefit from more usage of time-lapse video. Once a technique is shown at regular speed, the repetition could either be eliminated or shown through time-lapse.
2. I would find it helpful if the steps used in Photoshop were available as a PDF download so that I can have it to reference when I try the technique demonstrated.
3. I would love it if Miss Art’s would offer single class purchases and allow viewing of at least one full video prior to purchase. That would allow better decision making, could continue the revenue stream for Miss Arts and the instructors, and allow new students to access Miss Art’s classes.
Class name: Miss Art's Guide to Mists
Hosted by: Amanda Jones
What I Loved:
1. I loved how thorough Amanda was throughout the video. She did a fabulous job setting up the parameters of the video; what mists would be used, what materials would be misted.
2. I loved learning which mists are better for which application.
3. I loved Amanda’s accent and that she wrapped up her presentation by declaring her favorites for particular purposes.
Great Value:
As a result of the thoroughness of Amanda’s presentation, I had a better idea of which mists I wanted to add to my craft room, and I had more security in knowing that the mists would meet my expectations as a result of watching the videos.
Improvements/Room for Growth
1. Miss Art’s is different from many other venues that offer classes in that there are no supplementary downloads offered. I personally find it helpful to be able to read a downloaded PDF, or to be able go back a view a video again.
2. The only way to access older classes is by purchasing the “Extra Credit” membership, which allows access to all classes for up to one full year. Perhaps Miss Art’s could consider adding a purchase option for the older classes that would allow access to just that particular class.
3. Although Miss Art’s does offer many paper crafting supplies, some of them very unique and not to be found anywhere else, this is not an online store where you would be able to find a huge variety of supplies. Instead, Miss Art’s restricts the store offerings to those lines and products that are either very unique, or are used in classes or workshops.
Details about Miss Art's:
On the education side, Miss Art’s offers three levels of monthly subscription; 101 Level ($10 per month), 201 Level ($5.00 per month), and Extra Credit ($15.00 per month). At the 101 Level, you are given to access to 3 new classes each month as well as access to classes posted within the last 90 days. Level 201 classes are longer, more intensive classes, with one new class posted monthly offering advanced techniques. For those of us who want it all, subscription to Extra Credit not only affords you access to both Level 101 and Level 201 classes, you are also given full access to all classes offered within the last year. Want more information about Miss Art’s classes? You can access subscription information here: http://missartspapercrafting.com/subscribe and read FAQs here: http://missartspapercrafting.com/faq
Thanksgiving Projects
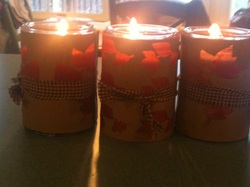
Here are some last minute Thanksgiving projects I did using Lettering Delights and my Gazelle digital cutter. I wanted to make some custom candle wraps with leaf cut-outs and put a pretty fall-colored layer behind the cut-outs. First, I decided to experiment with the base layer. I knew I wanted to colors to show, so first I tried alcohol inks on transparency. It worked, but the colors were too muted for the effect I wanted. Next, I tried alcohol inks on vellum. If you've never tried it, I can tell you for a fact it doesn't work. As I racked my brain trying to think, what else could I use? Spray mist! Yes! So I tried Maya Roads Salmon Metallic, Fig Magenta and Sunflower Yellow Wanting a bit more gold sparkle, I added as a last step Tattered Angels Glimmer Mist in Iridescent Gold. Each piece I did turned out a bit differently, so if you like precise results, this is not for you. Another tip, use painter's tape to secure both long edges of the vellum to the bottom of your spray box because as the vellum gets wet, the edges curl. I also used my heat gun to speed up the drying time. Then I put all my pretty pages under my large Basic Grey cutting mat to allow all the edges to flatten overnight. While I was waiting for that step, I opened up Make-the-Cut and imported Leaves from the Seasons set from Lettering Delights. Two of the leaves are already joined, so all I did was move the third leaf so that the stem intersected with the top of the other leaf and joined the shapes together. Voila! Next, onto determining the candle wrap. I picked up some scented candles from Wal-Mart and I deliberately chose tall rather than wide because I didn't want to have to piece together the paper. Fortunately, a 12" wide piece of paper just wrapped around my candles. Then I measured the height of the candle and subtracted an inch to leave a solid border. Then I copied my new leaf design onto my mat and resized it so that it would measure about 4 inches high (my candle is 5" high). Then I used the copy and paste into place command to get duplicates. Three copies would fit into a 12" wide piece of paper and leave a margin all the way around. I also used the align vertical and space vertical commands to make sure that my shapes were aligned evenly across the space. Time to cut! I put kraft cardstock onto my mat and did the cut. Success! Since I was doing duplicates, all I did was use the arrow buttons on my machine to have it feed the paper back out, turn the mat around, and put the paper back into the cutter and repeated the cut command. When I lifted the paper, it reminded me of cookie cutter shapes left on my mat. Needless to say, I've saved all the cut out leaves and will try to use them in another project! Then using my paper trimmer I cut 5" from each end to make two wraps. Now, how to attach the vellum to the paper? The best solution I found is using my full size Xyron 900 Repositionable Adhesive and my brayer to ensure that the adhesive is fully applied. I then wrapped each candle with the new shade and tied a ribbon around to make sure it stays (a few pieces of tape hidden will help too). For the middle candle, I did the same thing except I made the leaves smaller and used the duplicate command within Make-the-Cut to fill my page with mini-leaves. I think I like that one the best because it shows the pretty colors more. They will all look gorgeous once the candle burns down a bit.
| So Thankful
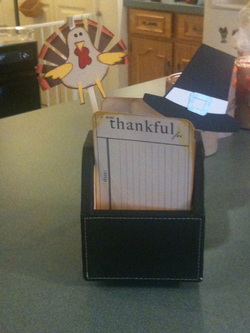
This project was easier than the candle wraps because Lettering Delights did all the layering work for me! I saw a blog post about creating journaling cards and having everyone fill one out and I wanted to do it for myself (blog post and free download here). I downloaded the free journal card template and printed on cream colored cardstock. Once I trimmed them, I selected 4 fall colors of distress inks to give each edge some definition. Done! Then I decided that instead of making decorative accents, that my pieces would be attached to pens making them functional as well. So I opened up my Make-the-Cut and accessed Lettering Delights Stuffing Stitchy which has some adorable cutting files with all the layering already done. I double clicked on the turkey, resized it so it was at least 3.5" tall and then selected the entire image and used the 'to each its own' command within layering so that each color was on its own layer. Then I selected the color papers I wanted and cut each one. Once that was done, I liked the results but decided that it needed more definition, so each layer got a treatment of Vintage Photo Distress Ink around the edges. Since the turkey wattle is so oddly shaped, I just used a brown journal pen to go around the shape to give it more definition as well. I only skipped the top yellow legs because they were so tiny I was afraid I would color the whole thing. I then used Beacon 3 in 1 glue to layer the turkey (orange behind, brown in front) of a coffee stirring stick (Thanks Starbucks!). Cute, yes? I then decided to also do a pilgrim hat. Since this only had one layer, I created a drop Shadow within Make-the-Cut and left the margin pretty small, about .15 of an inch. I did the same thing to attach it the coffee stirrer. Not content, I then wrapped each custom decoration to a pen using colored Duck Tape. Cute and functional! Everything then went inside this swivel organizer I found at Hobby Lobby. I might decide to create a custom wrap for the outside of the organizer, but if I do, it has to be able to be removed, because I have plans for this during December as well! Stay tuned!
|

 |